Table of Contents:
Preface:
In this post we’ll be discussing setting up full service HF PBBSs in linux. Running a PBBS is not huge ordeal but if you intend to use forwarding (which will be covered in a later post) you will need to do the legwork for figuring out the legality in your country. Onwards!
Why linBPQ:
I’ve choosen linBPQ as it is cross-platform, source is made readily available, and has a large and active community. I think it’s unlicensed freeware at the moment. It does however use code from other open-source projects that may require it to have reciprocal licensing. The point being, the community can fork, fix, or take over development in the future when the time comes. All of G8BPQ’s projects are fairly easy to set up build environments for. It’s not the only game in town though. JNOS and linFBB are other PBBS/PMS open-source wares that are being actively developed and worth a look and I may cover them at a later date. One of the coolest features of linBPQ is the ability to expose telnet ports to radio traffic enabling all kinds of interesting opportunities.
BPQ Configuration:
The linBPQ software suite is broken up into three main configuration files. These files are for the main linBPQ instance, BPQChat, and BPQMail. Chat is similar to conversd for those familiar with the classic amateur radio chat software for linux; it’s a multiuser chat reminiscent of IRC. BPQMail is the BPQ BBS/PMS software.
Before we start we need to grab the HTML pages for the BPQ web management interface.
cd ~/.config/linbpq/ && mkdir HTML && cd HTML
wget https://www.cantab.net/users/john.wiseman/Downloads/Beta/HTMLPages.zip
unzip HTMLPages.zip
bpq32.cfg
This is the config for my basic BPQ node with no forwarding set up for use on Net105 and Net40. I’ve replaced passwords and my call sign with placeholder text. You’ll need to set that up however you want. I’ve left the INFOMSG text as I have it. You’ll need to change this but I wanted to show an example because it’s not clear otherwise how this could be formatted.
USER = part of a username
CALL = callsign
GRID = maidenhead grid for the BPQ node map
There is also the availability to set text for the node map but I’ll let you look that up if you want it or a more in-depth explanation of any of these settings.
nano ~/.config/linbpq/bpq32.cfg; ;
; linBPQ config File ;
; ;
;*************** Core Node Settings ****************;
OBSINIT=6;
OBSMIN=4;
L3TIMETOLIVE=20;
L4RETRIES=3;
L4TIMEOUT=60;
T3=120;
IDLETIME=720;
BBS=1;
NODE=1;
MAXLINKS=256;
MAXNODES=1000;
MAXROUTES=144;
MAXCIRCUITS=160;
MINQUAL=191;
HIDENODES=1;
L4DELAY=10;
L4WINDOW=4;
FULL_CTEXT=1;
AUTOSAVE=1;
SAVEMH=0;
ENABLE_LINKED=A;
NODESINTERVAL=0;
IDINTERVAL=0;
IDMSG:
***
BTINTERVAL=0;
LINMAIL;
LINCHAT;
;*****************************************************;
; ;
;**************** Personal Settings ****************;
NODECALL=CALL-7;
LOCATOR=GRID;
CTEXT:
BPQ Node: ? for Help >
***
INFOMSG:
Sysop: N6CTA
SKED: UTC-7 20m Sunrise 40m Sunset
RIG: FT-897D @ 100w + LDG-600PROII + Hi-Z Guenella 1:1
USB INTERFACE: SCU-17
ANT: DIY OWL fed nonresonant dipole 7.5m AGL
COMP: Raspberry Pi 4b
OS: Raspberry Pi OS 32-bit
SOFTWARE: Direwolf/linbpq/hamlib/QtTermTCP
BLOG: n6cta.com
EMAIL: EMAIL@EMAIL.COM >
***
;*****************************************************;
; ;
;******************* Port 1 DW *******************;
PORT;
PORTNUM=1;
ID=300Bd FX25 DW;
DRIVER=BPQtoAGW;
COMPORT=8000;
CHANNEL=A;
QUALITY=0;
MAXFRAME=1;
FRACK=15000;
TXDELAY=500;
RESPTIME=1000;
SLOTTIME=100;
FULLDUP=0;
PERSIST=63;
TXTAIL=100;
RETRIES=15;
DIGIFLAG=0;
ENDPORT;
;*****************************************************;
; ;
;****************** Port 2 Telnet ******************;
PORT;
PORTNUM=2;
ID=Telnet Server;
DRIVER=TELNET;
CONFIG;
SECURETELNET=1;
LOGGING=1;
DisconnectOnClose=0;
TCPPORT=8010;
HTTPPORT=8008;
FBBPORT=8011;
CMDPORT=8015;
LOGINPROMPT=u:;
PASSWORDPROMPT=p:;
RELAYAPPL=BBS;
LOCALECHO=NO;
MAXSESSIONS=10;
CTEXT=BPQ Telnet Server\n'?' for Help>\n;
USER=USER,PASSWORD,CALL,NODE,SYSOP;
USER=USER-chat,PASSWORD,CALL,CHAT;
USER=USER-bbs,PASSWORD,CALL,BBS;
ENDPORT;
;*****************************************************;
; ;
;******************* Applications ******************;
;1 2 3 4 5 6 7 ;
;#,BPQ CMD,BBS CMD EXE,CALL,ALIAS,QUALITY,ADD'L CMD ;
APPLICATION 1,BBS,,CALL-1,,255;
APPLICATION 2,CHAT,,CALL-4,,255;
APPLICATION 3,K2K,C 2 HOST 0 K S,CALL,,0;chatconfig.cfg
You’ll want to change GRID to your grid if you want it to show up on this map under the Chat Network tab.
nano ~/.config/linbpq/chatconfig.cfgChat :
{
ApplNum = 2; Application Number
MaxStreams = 10; Maximum simultaneous connections
chatPaclen = 60; Packet Length
OtherChatNodes = ""; Other nodes connected
ChatWelcomeMsg = "/h for Help>"; Welcome msg
MapPosition = "GRID"; Maidenhead Locator
MapPopup = ""; Popup info for Chat Map
PopupMode = 0; Enable popup for Chat Map
};
linmail.cfg
This is one config file you can skip creating and start with a default that you configure from scratch through the web interface. I’ve let this here mainly for reference.
main :
{
  Streams = 10;
  BBSApplNum = 1;
  BBSName = "CALL";
  SYSOPCall = "CALL";
  H-Route = "";
  AMPRDomain = "";
  EnableUI = 1;
  RefuseBulls = 1;
  OnlyKnown = 0;
  SendSYStoSYSOPCall = 1;
  SendBBStoSYSOPCall = 1;
  DontHoldNewUsers = 1;
  DefaultNoWINLINK = 1;
  AllowAnon = 1;
  DontNeedHomeBBS = 1;
  DontCheckFromCall = 1;
  UserCantKillT = 0;
  ForwardToMe = 1;
  SMTPPort = 25;
  POP3Port = 110;
  NNTPPort = 0;
  RemoteEmail = 1;
  SendAMPRDirect = 0;
  MailForInterval = 35;
  MailForText = "";
  AuthenticateSMTP = 0;
  MulticastRX = 0;
  SMTPGatewayEnabled = 0;
  ISPSMTPPort = 0;
  ISPPOP3Port = 0;
  POP3PollingInterval = 0;
  MyDomain = "";
  ISPSMTPName = "";
  ISPEHLOName = "";
  ISPPOP3Name = "";
  ISPAccountName = "";
  ISPAccountPass = "";
  Log_BBS = 1;
  Log_TCP = 1;
  Version = "6,0,24,11";
  WelcomeMsg = "Hi $I. $x Unread. ? for Help\r\n";
  NewUserWelcomeMsg = "Hi $I. $x Unread. ? for Help\r\n";
  ExpertWelcomeMsg = "Hi $I. $x Unread. ? for Help\r\n";
  Prompt = ">\r\n";
  NewUserPrompt = ">\r\n";
  ExpertPrompt = ">\r\n";
  SignoffMsg = "73\r";
  RejFrom = "";
  RejTo = "";
  RejAt = "";
  RejBID = "";
  HoldFrom = "";
  HoldTo = "";
  HoldAt = "";
  HoldBID = "";
  FBBFilters = "";
  SendWP = 0;
  SendWPType = 1;
  FilterWPBulls = 1;
  NoWPGuesses = 0;
  SendWPTO = "";
  SendWPVIA = "";
  SendWPAddrs = "";
  MaxTXSize = 99999;
  MaxRXSize = 99999;
  ReaddressLocal = 0;
  ReaddressReceived = 0;
  WarnNoRoute = 1;
  Localtime = 1;
  SendPtoMultiple = 0;
  FWDAliases = "";
};
BBSForwarding :
{
};
Housekeeping :
{
  LastHouseKeepingTime = 1697846409L;
  LastTrafficTime = 1697328002L;
  MaxMsgno = 60000;
  BidLifetime = 60;
  MaxAge = 60;
  LogLifetime = 7;
  MaintInterval = 24;
  UserLifetime = 0;
  MaintTime = 0;
  PR = 30.0;
  PUR = 30.0;
  PF = 30.0;
  PNF = 30.0;
  BF = 30;
  BNF = 30;
  NTSD = 30;
  NTSF = 30;
  NTSU = 30;
  DeletetoRecycleBin = 0;
  SuppressMaintEmail = 1;
  MaintSaveReg = 0;
  OverrideUnsent = 0;
  SendNonDeliveryMsgs = 1;
  GenerateTrafficReport = 1;
  LTFROM = "";
  LTTO = "";
  LTAT = "";
};
UIPort1 :
{
  Enabled = 1;
  SendMF = 1;
  SendHDDR = 0;
  SendNull = 0;
};
UIPort2 :
{
  Enabled = 0;
  SendMF = 0;
  SendHDDR = 0;
  SendNull = 0;
};
BBSUsers :
{

};
Systemd Service:
sudo nano /etc/systemd/system/linbpq.service[Unit]
Description=linBPQ Start Script
After=network.target
[Service]
WorkingDirectory=/home/USER/.config/linbpq/
Restart=always
RestartSec=20
StartLimitInterval=60
StartLimitBurst=3
User=USER
Group=USER
ExecStart=/home/USER/.local/bin/linbpq
SyslogIdentifier=linBPQ-Debug
[Install]
WantedBy=multi-user.targetsudo systemctl enable linbpq.service
sudo systemctl start linbpq.servicelinBPQ Web Management Interface
Since the web interface is fairly straight forward if you poke around a bit I’m not going to go into it very deeply. The port for the web interface is set via the ‘HTTPPORT=’ entry in the bpq32.cfg configuration file and web server comes up on startup of the application. You can connect to it using localhost as the address and the port you configure.
When connecting via host, you will be granted Sysop privileges. If you use a VPN to connect you’ll need to log in using the telnet user and password with the SYSOP flag set in bpq32.cfg.
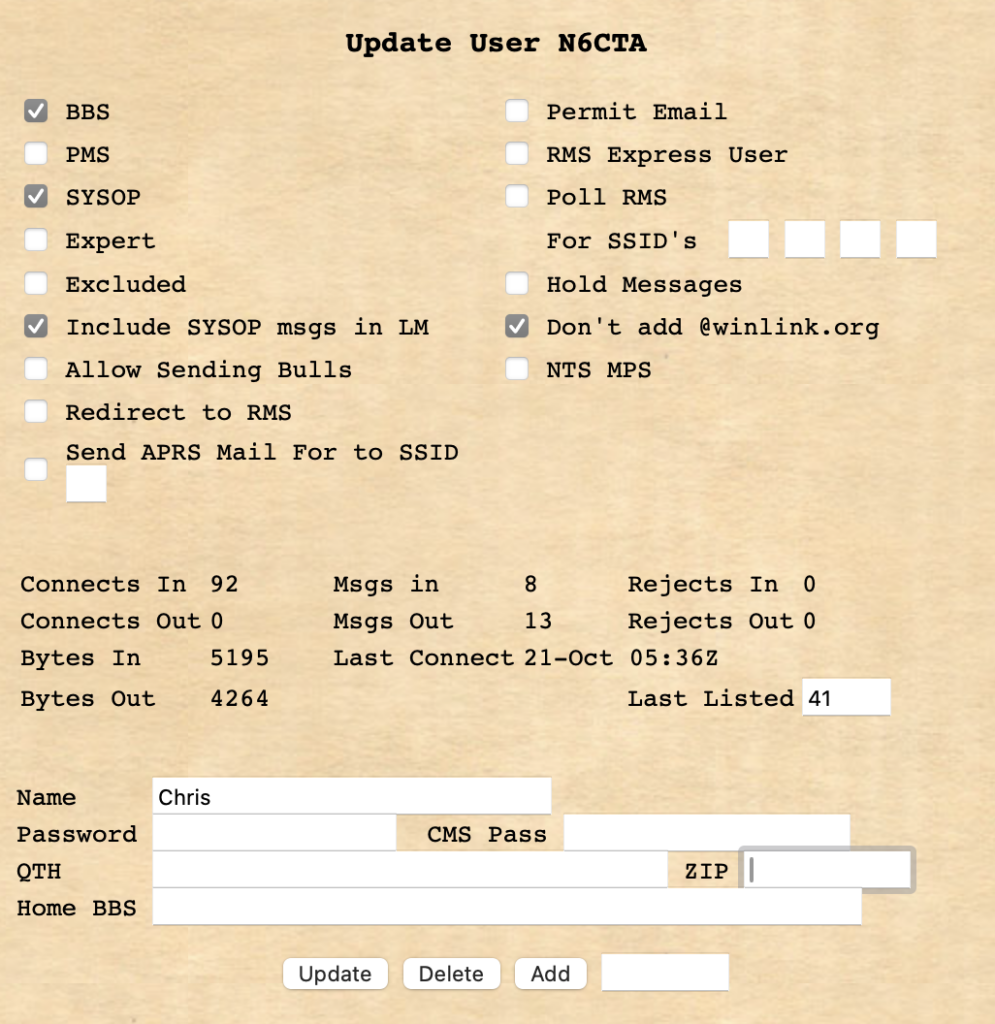
The first thing you’ll want to do is make sure you have a Sysop mailbox account under the “Mail Mgmt” tab. This is how I have mine set up. Making myself a BBS user allows me (along with the requisite bpq32.cfg CMS settings) to connect to my mailbox over telnet using Pat and RadioMail.
One thing I will mention that is not obvious is that under the “Ports” tab is where you will be able to configure the Beacon interval and message by clicking the ‘Beacons’ link for the port in question. Some interface types allow you to do this within bpq32.cfg in the port config but others allow you to do this via the web interface. For this reason I only set these value through the web interface to not be, “a person with two watches,” as they say.
What’s Next?
At this point we’ve got ourselves a working, reboot safe HF PBBS! The next post in this series will cover how I have my QtTermTCP program setup to work with a BPQ BBS.