Table of Contents:
- Preface
- Prerequisites
- Requesting an Allocation
- linBPQ Configuration
- OpenWRT Configuration
- UFW Configuration
- Verifying AMPRnet Connectivity
Preface:
AMPRnet and the 44.x block has long been a thing I was interested in knowing more about. I’m not going to get deeply involved in the history or politics because I have lots to say that wouldn’t help us in our effort to get connected. The way I went about figuring out how this all worked was to just jump in head first and see what was possible with gear and software I was already using. The main application for my gateway currently is to build out a global linked network of IRCd with RF accessibility via PBBS. I also use AMPR for AXUDP links but it’s wholly necessary as AXUDP linking can be done directly IP<>IP in linBPQ.
There are two main types of IP allocations you can request from AMPR and they differ greatly in application. If all you want to do is connect to other AMPR machines, you want an IPIP allocation. This allows you to connect via IPIP tunnel to others on the IPIP mesh. This works well for connecting radio amateurs and offering services that may be RF capable hidden behind a little bit of networking rigamarole. The other type of allocation is a BGP allocation. You’d only request this type of allocation if you wanted to expose an amateur radio related service directly to the internet such as with Echolink/ASL, websites, etc, and you’re going to verify non-amateurs won’t have access to RF connected things in the amateur spectrum allocation. Setting up a BGP allocation and getting it announced is way beyond the scope of what this is going to cover.
There are two huge gotchas with IPIP aka IP encapsulation aka IP tunneling aka IP protocol 4. 😅
- Not all ISP’s will pass the traffic due to security concerns
- Not all router software allows you to pass the traffic due to security concerns
I’m currently with Frontier on a fiber connection and using the latest stable OpenWRT release as my router software. This works for me. This tutorial covers setting up an AMPR IPIP mesh gateway using OpenWRT, linBPQ’s built-in AMPR gateway feature, and a Linux firewall configured using UFW. LinBPQ will be run on a Raspberry Pi 4b running the latest 64-bit Raspberry Pi OS. This tutorial specifically covers setting up a residential IPIP AMPR gateway using a single contiguous IPIP allocation. Anything else will be your experiment. Let me know how it goes with other types of working residential ISP/hardware setups and I’ll make a note about it here. YMMV if you decide to walk off the designated path.
Prerequisites:
- An ISP capable of passing IPIP
- OpenWRT Router
- A Raspberry Pi with networking capability
- A working linBPQ node set up
Requesting an Allocation:
You will need to request a block from the IPIP segment once you are registered on the AMPR portal. The link to the specific allocation to request your IPIP allocation from is here. I would advise you to request a /29 allocation to start. This gives you six usable AMPR addresses to play with. Once you get your allocation, you’ll need to register the gateway. As mentioned in the AMPR wiki, you’ll probably want to set up the gateway using a DDNS host unless you have a dedicated residential IP. I personally use ddclient and a domain that I own to accomplish this. Setting that up is beyond the scope of this tutorial. At this point, within a few hours max, you should start to see RIP traffic to your OpenWRT router every five minutes from the UCSD gateway (169.228.34.84). The traffic should be getting flagged as it’s dropped which allows us to conveniently see it in the syslog. The log webpage is CTRL+F searchable. You can check this in LuCI by going to Status > System Log. If you don’t see any traffic and you are sure the gateway portal information is correct, your ISP likely doesn’t pass IPIP traffic. If this is the case, I would stop here and set up a VPS based gateway instead.
LinBPQ Configuration:
This is how you need to have your IPGateway block configured for this to work. Whenever you make a change to the BPQ config, the service will need to be restarted.
IPGATEWAY
  Adapter eth0
  44ENCAP 192.168.1.X
  IPAddr 44.x.x.x
  IPNetMask 255.255.255.x
  ROUTE 44.x.x.x/x DDNSADDR T
***- Adapter
- The network interface you intend to use (internet capable)
- 44ENCAP
- Unallocated LAN IP for BPQ’s pcap interface
- IPAddr
- First usable IP in AMPR allocation
- IPNetMask
- Netmask of AMPR allocation
- ROUTE
- Your AMPR allocation, DDNS host, T (for tunnel interface)
OpenWRT Configuration:
I discovered that this part is actually surprisingly easy after a lot of fussing. In LuCI, under Network > Firewall > Port Forward, you will add a new entry as shown below.
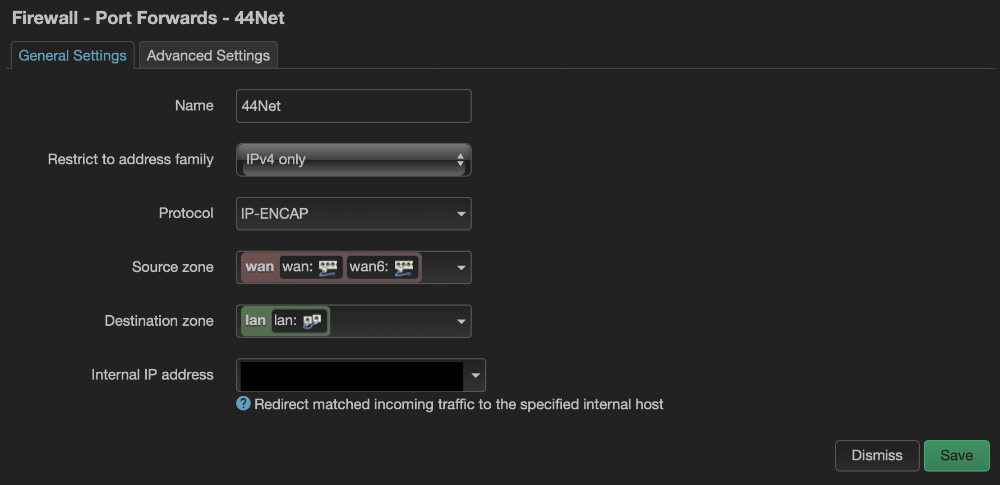
To get the IP-ENCAP option to show under protocol, in the custom option under the protocol dropdown, enter the number “4” as in IP Protocol 4. For the internal IP address, you’re going to enter the linBPQ virtual encap address we assigned earlier in the linBPQ IPGateway entry. What this rule does is pass all IPIP traffic to the linBPQ pcap interface. It’s an IPIP DNAT rule. LinBPQ’s IPGateway already rejects all traffic that isn’t from the AMPR block so it’s fairly safe. Since the default for OpenWRT firewalls is to allow all LAN>WAN, nothing else is required. This is a sane default.
UFW Configuration:
While the above now has our BPQ host operating as a AMPR GW, every service on the linux host is now accessible to anyone with AMPRnet access The way IPIP tunnels work, there are no source or destination ports the router can look at unless it is the one unencapsulating the traffic. That’s why there are some serious security concerns related to the protocol. You probably don’t want to leave this machine wide open even on AMPRnet so we will put a firewall up to control port access at the host level since it’s where the unencapsulation lives. I like UFW so that’s what we are going to use for this. UFW is installed on Raspberry Pi OS by default.
To install it:
sudo apt install ufwNext we need to set up some sane defaults:
sudo ufw default deny incoming
sudo ufw default allow outgoing
The next important thing we need to do is forward UDP 520 so that we can get our RIP traffic from the UCSD gateway:
sudo ufw allow UDP 520Before you enable UFW, you need to add rules for each service you’d like open to AMPRnet or that you need to access from another machine on the LAN. I’m not going to cover UFW completely; you can follow this tutorial to get you up to speed on how to configure a Linux firewall using UFW. Typically, I restrict all of the important services like SSH, VNC, etc. to only addresses originating from the LAN. That will prevent the bulk of naughty things from happening.
That looks like this:
sudo ufw allow from 192.168.1.0/24 to any port 22
To allow AMPRnet access to something like my IRCd:
sudo ufw allow 6667Enable UFW:
sudo ufw enableVerifying AMPRnet Connectivity:
This is very easy to do with QtTerm using some commands built into the IPGateway software. While connected to your linBPQ node via telnet, enter:
iprIf you have recieved RIP traffic you should get back:
ALIAS:N0DE-7} 836 Entries
44.0.0.1/32 0 T 1 3567 encap 169.228.34.84
...
..
.
Next, lets try to ping the UCSD gateway from BPQ:
ping 44.0.0.1We should get back:
OK
 Response from 44.0.0.1
If you do not get a response back something is broken. 😞 However, if you’ve gotten this far without issue, the above command should just work. Let me know if it doesn’t and I can try to help you troubleshoot it. If all has gone accordingly, you now have a working AMPRnet gateway. You can assign addresses from your block to other machines on the network or serve up stuff from the gateway host. The rest is up to you!